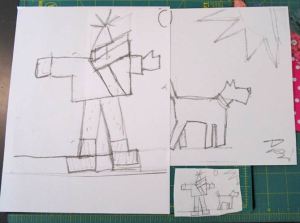
 Here I am…decked out for snow. The bright orange pants are truly a bit of “artistic license.” In my block portrayal of Della, I went free-form. In other words, I just cut and sewed without much of a plan. Since my selfie was a bit more complicated, I made a small sketch of my idea–about 2″ tall, and then blew it up on my copier 400%. That sure made things a lot easier when I was trying to judge how to cut the pieces and put it together.
You can see the small sketch in the lower right–and the blown-up version. You can also see I’m going to include Decker the dog–he’s next.
At the risk of boring you to tears–here’s a few tips on how I made the “me” block. First, I divided my sketch into sections.
 From there, I could see how to make the sections, and the approximate size of the pieces I wanted. That was the nice thing about having a full-scale drawing! If you try this, don’t forget to add 1/4″ seam allowances to the pieces. As you can see below, I just laid sections on top of the sketch to get the angle I wanted, then trimmed with the added seam allowances.
Note how much longer the scarf/body is than the final block shows. It’s sooo much easier to make something longer–I like to fold it to where the seam needs to be and press it. That way I can lay it on top of the next piece and know exactly where to sew to get the look I want.
Next are the beginnings of the face and hat. You can also see that I have a habit of making the pieces lots bigger than I need–it’s easier and they can always trim down. The tassels on the hat were Della’s idea–it worked out great! I started with a small (~1-1/2″ tall x 3/4″ ) rectangle of bright red fabric. Then I folded down the top edge, and folded it in half lengthwise. I inserted it between an angled seam and viola! I did that a few more times until I liked the angles.
That’s it for now. I’ve been making stars and checkerboard strips in-between all the stopping and starting. I’ve got thirteen 6″ stars done…guess I’d better get busy.
🙂 Karen


Love the Karen block. And the orange pants!
Rita
I love it! Especially the thump on your hand. I’m Looking forward to see Decker the dog.
ditto to Della’s comment
This one looks a bit more complicated, but shows how to draft for other types of clothes. Real cute! I especially like the tassel on the hat.
I have enjoyed seeing the step by step process you go through to create something out of the ordinary. This is going to be a really special quilts.
The top on your hat is a great addition! Especially love your idea about folding the fabric a 1/4″ to get an idea of where to go next! Brilliant 🙂